So curtains are expensive. I am cheap. Enter DIY curtain making. Curtains are just about the easiest thing you can make. They are usually made of rectangles that you hem on all sides. I could tell you how to make a set in one sentence. Cut a rectangle to fit your window, hem the sides and bottom and fold over and stitch a pocket for the rod at the top. Boom. I could even stop this post now and you could go make a pair... but I won't because I want to show you how to make a cuter option.
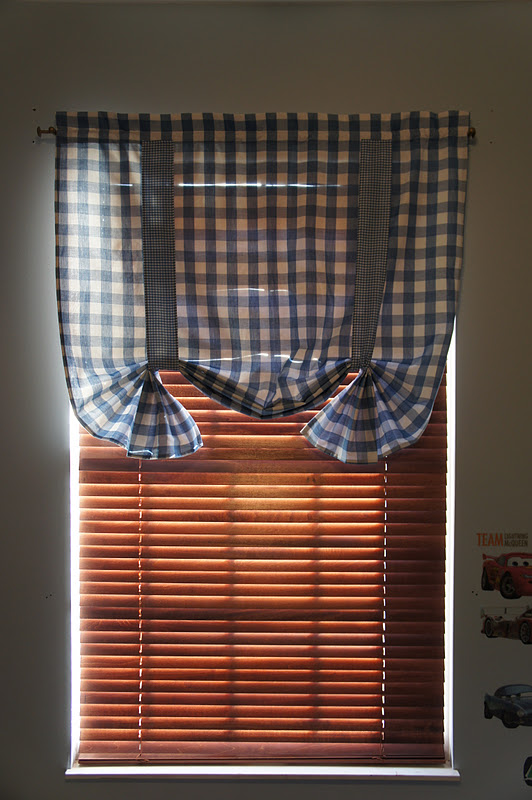
This is a decorative window covering. Not really a curtain and please don't call it a valance. It is not functional. It does not open and close. It is just pretty.
I put wood blinds in my little boys bedroom and wanted something to dress the window up a little without looking girly. This is what I did.
And this is how I did it.
First things first. If you want to be able to wash your curtains, wash your fabric before you begin. If it can't be thrown in the washing machine or dishwasher, the chances of it surviving my house are pretty slim. Obviously I washed my fabric.
Once it was washed and dried I held it up to my window to see how it would look. I realized it was very see-thru and decided it needed to be lined to look the way I wanted. I will show you how I lined my curtain, but you do not have to line yours.
I bought 1.5 yards of fabric which ended up fitting my window really well. All I had to do was trim the top and bottom to make straight edges. If that is not your situation you will have to measure the window and decide how you want your curtain to look. I did not want my curtain to gather across the window so I made it the same width as my curtain rod (you could easily make yours gather by making it wider than your window). My window is also pretty tall and I did not want that much fabric to gather up so my curtain is only about 3/4 the height of my window (if you want to be able to let your curtain down to cover the whole window make it the same length as the window or longer). Once you know your dimensions it is time to cut.

First I laid my lining fabric out.

Then I laid the curtain fabric I had cut to size on top (don't forget hem allowances in your measurements-I added 2" on the width and about 5" on the height). Notice my lining is a little bigger so I can cut it to fit the curtain fabric perfectly. I pinned the two layers together and stitched around, following the edge of the curtain fabric.

Then I trimmed the extra lining fabric.

Now it's time to hem the sides. I pressed in about 1/2" on each side.

Then folded it over again and pressed. This gives a nice clean edge. I stitched up each side and repeated this process on the bottom hem.

For the top you will need to create a pocket for the curtain rod. The way you stitch the top will depend on how large your rod is and if you want extra fabric above the pocket or if you want the pocket to run at the top of your curtain. I wanted extra fabric above my pocket and my pocket needed to be about 1" to fit my rod (my rod is pretty small... did that sound dirty?). First I folded over about 1/2" and pressed it.

Then I folded over about 3". I stitched one line at the bottom where I had made my 1/2" fold, then about 1" above that line of stitches to make my pocket. That left a little over an inch of fabric above my pocket for decoration.

I forgot to take a picture after this step so here is a picture a little farther into the process (disregard the small checked fabric for now). You can see the two rows of stitching.

All that is left to do now is the ties. Decide how wide you want them. I wanted mine 3" wide. I added 1" for my hem allowance. You also need to decide how you want these ties to work. Do you want to tie them in knots on the front of the curtain? Bows? To you want to only see a strip of fabric on the front like mine? That will determine how long to make the ties. I wanted to be able to change mine up so I made mine the width of the fabric (they ended up being about 40" long by the time they were hemmed). I cut 4 of the strips...

and hemmed the strips the same way as the curtain sides. I turned in 1/4" and pressed and then folded over again. I did this to the sides and ends of each strip.

All my pieces are now finished and all I have to do is stitch the ties to the curtain. I laid mine out to see where I wanted my ties to be.

Then I pinned the ties in place. One on the front...

and one directly behind it on the back. Like a sandwich. I pinned through all layers from the front not from the back, so I could take the pins out as I sewed.

I then stitched the ties to the curtain.

All I had to do was hang it up and get it adjusted the way I wanted it. I tied my strips in the back for now. I also folded my curtains up accordion style 2" at a time, but you could just let them gather as you tie for a drapier effect.
There you go! I have lots more windows to dress so keep your eyes open. I just might show you some other ideas!
***Like making your own curtains? Check out another DIY curtain tutorial here.***
No comments:
Post a Comment