Showing posts with label Crochet. Show all posts

Friday, November 29, 2013

Granny Quilt Take 2

I love mixing techniques together.  One of my favorites is crochet and quilting.   I love the combination of the texture that crochet brings with the warmth and stability that the fabric has.  These are great winter blankets since all the "holes" from crochet are covered.  I also love to use them when I put my little ones on the floor.  They have a little extra cushion since they are two layers.  If you want a really cushy version, check out my first take on a granny quilt - Granny Quilt Number 1 .  In this blanket I add a layer of fleece between the afghan and the fabric making it VERY thick and padded.

This version omits that fleece layer, giving you more of a blanket, less of a mat.  The first version is great and extremely warm, but not very flexible which is necessary to snuggly tuck a munchkin in their car seat.  So, if you love the Granny Quilt, but want a thinner option, try this!

My blanket after quilting and trimming.
 
The technique is simple.  Layer your pieced granny afghan on top of a piece of flannel (or cotton, but flannel is so cozy).  Be sure you have plenty of fabric so it hangs past the edge of the afghan.  I left about two extra inches on each side.  The last thing you want is the fabric to creep in while you sew leaving a gap.
Pin at the corner/intersection of EACH granny square.  I know this sounds like overkill, but it serves two important functions. 
First it keeps the layers from shifting and stretching.  The afghan will have a lot of give and having it well pinned will keep you from ending up with a distorted blanket. 
Second, it helps to know exactly where your pins are.  They get lost in the afghan and if you know you have one at each intersection, you will not leave any behind to stab an unsuspecting person.
 
Now sew.  I run along the edges of the squares, but you can do whatever you wish, it's your blanket.  I do all the lines in one direction, then all the rows that run across, forming a checkerboard pattern.  Go slowly!  You have to do this with the crochet side up (so you can follow the lines) and it can easily get hooked on the presser foot.  Finish by sewing around the edge of the blanket.  This will make it easier to sew on the binding.
 
Trim any extra fabric from the edges.
 
 
Now bind and you are done!  Don't know how to bind?  See the simple technique I use here .


Friday, November 22, 2013

Circle in a Square

I love a good granny square blanket.  For instance:


or


My new favorite granny square is a cool, modern and very simple pattern.  I found it on every crafty girl's best friend and worst enemy, Pinterest.


The squares go together quickly and combine to make an amazing blanket.  Crochet on an edging and make and afghan, or sew a flannel panel on the back and bind the edges into a quilt like I did.  It is great for a baby blanket or full scale cover.  Make all the circles one color or each a different color to use up scraps.  The possibilities are endless! 
 
Want to make your own?  Check out the square tutorial from Three Beans in a Pod.  Then check back here tomorrow (or the next day, I might be lazy) for my simple tutorial on adding flannel backing and binding!


Monday, May 13, 2013

Make It Monday-Teething Ring Drool Catcher

I am tired of Monday's With the Maid (actually, tired of cleaning) and since it is my party, I decided to change it up.  Today I am going to show you how to make a really simple baby gift.  No joke, it will take you an hour...  if you are lucky enough to have an hour of un-interrupted work time.  As long as you know how to double crochet and hand sew, you are in business!

 
Teething Ring Drool Catcher


What You Need:
Cotton yarn (I use Sugar 'n Cream)
Crochet hook (I use H-5.00mm)
Velcro (about 1")
Teething Ring

What You Do:
ch 29
sc in 2nd ch from hook and each following ch to end of row (28 st)
Row 1: ch 2 turn, dc in first st, *sk1 dc in next st, dc in skipped stitch working in front of and around previously worked stitch, dc. Repeat to end.
Row 2:ch 1, turn. sc across
Repeat rows 1 and 2, 8 more times
Repeat row 1, leaving last 3 st unworked
Repeat row 2
Tie off
You will have a corner like this:
sc 3st down one side of the corner and sc 3 st across the other side. 6st
ch1, turn sc in each st
Repeat 11 times (13 rows)
This is the loop for the teether.
Tie off, weave in ends.
 
Sew Velcro to end of tab and base of tab.  I put the hook side on the tab and the loop side at the base.

 
Loop through a teether and you are done!
 
 
***Love this project, but don't crochet?  Look for a finished one in my Etsy store!***  http://www.etsy.com/shop/MODMOMMI


Thursday, April 18, 2013

Lining a Crochet Purse

Lining a knit or crochet bag is a very important step.  It helps protect the bag from damage, keeps it from stretching out and since these bags tend to have little holes, the lining helps keep your items inside.
Luckily, it is a really easy thing to do.  Here is how I do it.

 
First, I lay my finished purse on two layers of the lining fabric.  Using a pen, I draw a line about 1/2" outside the edges of the bag.  This does not have to be perfect.  No one will open out the lining and say "Oh my!  You're lining is crooked!"  If they do, slap them.  Tell the cops I said it was fine.
 
Next, with right sides together, sew around the outside edges of the lining.  Do not sew across the top.
 
Tuck the sewn lining into the purse, with the wrong side of the lining facing the inside of the bag. 
 
Turn the top edge in toward the bag and whip stitch the lining to the bag around the top.
 
For this bag, I started my lining right under the handles.  Don't go above the handles or you won't be able to use them.  Sounds like common sense, but I've been in a rush and done it.  Can't be pretty and smart.


See?  Simple.


Tuesday, April 16, 2013

Simple Crochet Purse

For Christmas I made my cousin's girls craft bags with their initials on them (see the post here).  Unfortunately, I have apparently been spelling one of the girl's names incorrectly for years.  Yeah.  When I realized her name was Kaydee not Caydee, I felt like a toad.  I apologized profusely and promised to make her another bag.  She was absolutely sweet and very forgiving.  I was a toad.

I decided to make her something completely different that takes way more effort to try to redeem myself.  Here is what I made her!


Simple Crochet Purse


Here is a link to the original pattern I used.
 
I made some changes starting with the pattern of the mid section.  The shell pattern used in the original, was a bit open and loose for what I had in mind.  Here is the pattern I used on the middle section of my purse (the lavender).
 
Round 1: sc in each stitch around
Round 2: ch3, skip first sc *skip next sc, dc in next sc, dc in skipped sc working over and enclosing previous dc (crossed dc made), dc in next sc.  Repeat from * around.
 
Repeat rounds 1 and 2 until desired height.  I did my middle section shorter than the original because I wanted a purse size, not a sack. 
 
Continue on with top section of original pattern.
 
When I was finished I added a lining to the bag.  That sounds like a good Thursday post...


Wednesday, March 27, 2013

Crochet Backed Quilt

I love combining textures and techniques.  Baby blankets are a great way to do that.  They are small, and work up quickly so you don't feel like you are doing the same project FOREVER. 

I found this pre-pieced fabric when I was pregnant with my little guy.  I decided it would look really cute with a simple crochet backing and some yarn tacking instead of stitch quilting.  But I flaked on it.  Imagine that.  I picked it up a couple of weeks ago and decided to finish it.  Here is what I did!


First I made the crochet backing.  I worked it up in a simple double crochet pattern and made it about 36" square.  You can use any yarn, pattern or size you wish.  This is simply a technique.

Next, I laid the afghan down on the quilt fabric and pinned it in place.  Leave some extra around the edge just in case it shifts while you tie it together.


Now for the very repetitive and boring part.  This is where I lost interest and flaked.  Be strong!  Don't quit!  It is worth it. 


Using embroidery thread or yarn (regular thread is not strong enough), tie your blanket.  Go in through the side you want your ties to show on, being sure to catch the afghan on the back (this is what holds the two layers together).

 
Be careful not to pull the tail through!  I like to leave about a 3/4" tail.  Bring the needle back to front about 1/8" away from where you went in.
 
 
Pull the yarn through leaving your tail showing and tie the two ends in a tight knot.
 
 
Snip the long end that is attached to the needle, leaving a similar length tail.  Repeat like, a million more times.
 
**I put my ties at the corners of my squares to make things easy, but you can use any pattern you want, just don't get more than a few inches apart or it won't do it's job of holding the layers together well.
 
**It can be difficult to pull the yarn through the layers.  I use a lid gripper (It is a flat piece of rubber to help grip jar lids while you open them) to help me grip the needle.
 
 
Now trim the extra fabric around the blanket.
 
 
Cut your binding strips.  I cut mine 2" wide.  The ONLY reason I do this width is because I have a ruler that is 2" wide and it makes it easy to mark the strips.  I do not cut mine on the bias.  Bias is only important if you have curved edges.  If they are straight, save yourself some difficulty and fabric and cut on the grain.  Once you have them cut, sew them together end to end into one long strip.  Press the seams open.
 
 
Now all you have left to do is sew on the binding.  I use a 1/2" seam allowance.  Here is the way I sew my corners.  Once you sew it on, fold it over, turning under the raw edge, and hand stitch it down.  I know.  It sucks.  Do it anyway.  It is the best way to do binding.
 
 
Boom.  Done.
 
 
***Like this blanket?  Want to see a similar style?  Check out my Quilted Granny Square Blanket tutorial OR my Crochet Granny Quilt tutorial.


Thursday, March 14, 2013

Slouchy Brimmed Cap (Crochet)

My daughter wanted a hat to go with her hot pink coat.  I wanted an excuse to make this super cute hat I found at lionbrand.com.  Every one's a winner!


She picked out the yarn which was just Red Heart Super Saver and coordinates with that VERY pink coat.  This hat is all single crochet and as long as you know how to read a pattern and can do math in your head pretty well, relatively easy.  I loved that you make a lining for the brim, giving it more stability.  I love this hat so much, I will be whipping one up for myself...  in a different color.

Here is a link to the pattern:  http://www.lionbrand.com/patterns/80777.html%20noImages

P.S.  Not to brag (Wait!  That's why I have a blog.), but I think my hat looks better than theirs.

Tuesday, March 12, 2013

Lacey Circle Scarf (Crochet)

I have been on a crochet kick lately.  I started knitting about 15 years ago and loved it.  My mother is a big hooker (hee hee) and makes the most beautiful afghans.  I guess I kind of assumed you were either a knitter or a crocheter er er er.  When I was pregnant with my littlest son, I found some of the cutest baby hat patterns and most of them were crochet.  I tried to guilt my mom into it, but she has this thing called a full-time job and my sister the personal trainer has already guilted up most of her time with work outs.  Therefore, I must crochet.

I was shocked at how easy it was to pick up.  I think the trick to either knit or crochet is how you hold your hands and maintaining proper and consistent tension so I was one step ahead of the game since I was a knitter.  I discovered that I could crochet much faster since the rows are usually wider.  I also discovered crochet is denser and stiffer making it great for blankets, booties and outerwear.  It is possible to crochet something lighter and softer, as long as you use the right stitch.

I wanted to make my daughter a circle scarf to wear on Friday's for spirit day at school.  She is delicate and I didn't want the scarf to overpower her.  I wanted it to be worn doubled up so it had to be soft and flexible.  I looked through some stitch options and here is what I came up with.

Lacey Circle Scarf
 
What You Need:
1 skein worsted weight yarn (I used Red Heart two tone)
Size K crochet hook
 
What You Do:
Chain 19
Row 1: (2dc, ch1, 2dc) in 5th st from hook *sk next 3 ch (2dc, ch1, 2 dc) in next ch* repeat to last 2 ch, sk next ch, dc in last ch
Row 2: ch 3, turn, (2dc, ch1, 2dc) in each ch1 sp across, dc in top of turning chain
Repeat row 2 until you have 72 rows total.
Sew or slip stitch ends together and weave in tails.


Thursday, March 7, 2013

Tiffany Inspired Baby Ensemble-Bootie Edition

Last week I shared the pattern for the Tiffany Inspired Baby Cardigan (see that pattern here). 


Today I am sharing the pattern I used for the sweet little booties. 


They are fairly easy and work up quickly as they are done in worsted weight yarn.  I did the soles in one color and the body of the boot in another.  The spot you start the chain for the flap seems wrong, but trust me, it is right (I was a non-believer and I had to start over).  This pattern also offers a non-scalloped version for all the little men in your life.  I plan to make a pair for mine and I will share them with you soon!  Here is the link for the pattern.  Happy hooking!

Tuesday, February 26, 2013

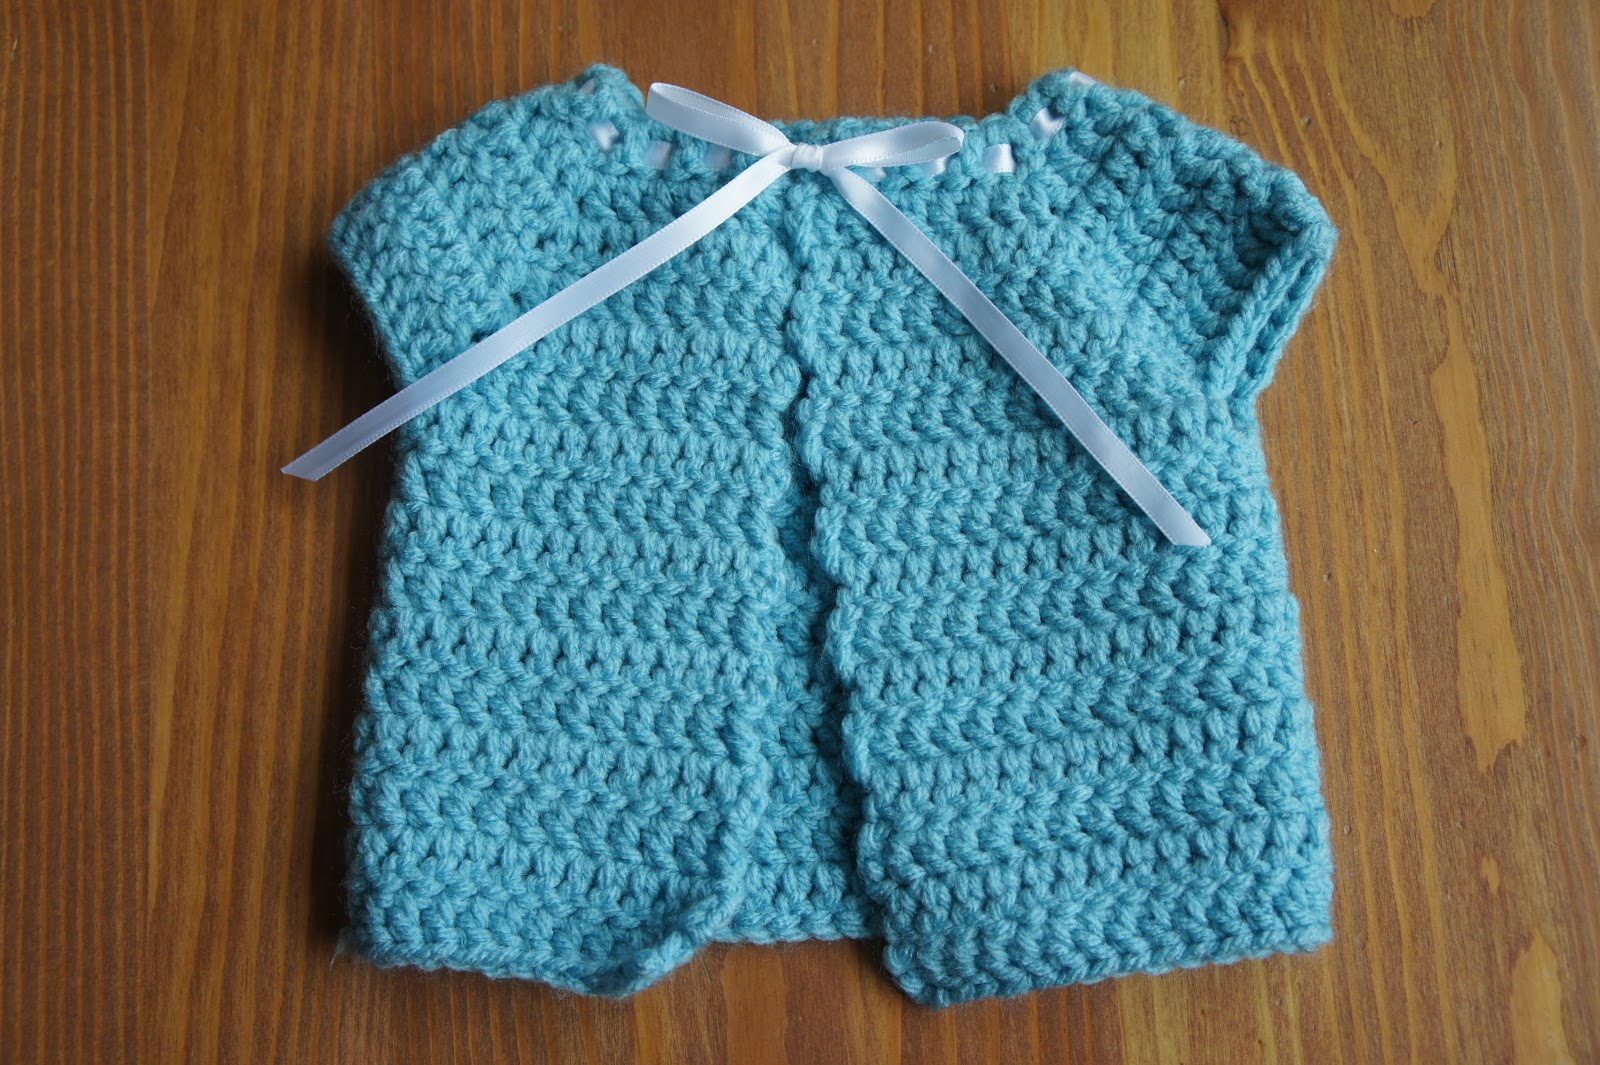
Tiffany Inspired Baby Ensemble

It is that time of year again.  The breeders are in overdrive.  I currently know six, yes six, pregnant women.  Be prepared for a lot of baby item postings.  Today I am sharing the cardigan pattern for my Tiffany inspired baby ensemble.


One of my three co-workers that is pregnant, loves Tiffany.  She even painted her closet Tiffany blue and put in a chandelier.  When I found this beautiful Tiffany blue yarn in my stash, I set out to find patterns that would fit my theme.  I found this sweater pattern on Ravelry.com.  I started to whip it up and found that the pattern is a little wrong.  Not a lot, maybe not at all, maybe just not explained properly.  I got about 1/4 of the way done and realized it was wrong.  I had to rip it back out and start over.  Luckily, this sweater works up VERY quickly, so it was not a big deal.  I decided I liked the way it looked with the little capped sleeves, so that made it extra fast.  It is the perfect gift for a summer baby.

Capped Sleeve Infant Sweater
 
Materials:
worsted weight yarn, you only need a small amount, not even 1/2 skein
size H crochet hook for newborn (I for 0-3 months)
yarn needle
1/2" ribbon
 
Directions:
Ch 37 (this is the neckline)
Row 1: DC in 3rd chain from hook and in the next 4 chs, (DC, ch 1, DC) in the next ch, DC in next 4 chs (this is the sleeve), (DC, ch 1 DC) in next ch, DC in next 12 chs (this is the back), (DC. ch 1, DC) in the next ch, DC in the next 4chs (other sleeve), (DC, ch 1, DC) in the next ch, DC in the last 6 sts, ch 3, turn
Row 2: Skip ch 3 space *DC to first ch 1 space (DC, ch1, DC) in ch space* repeat around three more times, DC to end, ch3, turn
Rows 3-6: repeat row 2 **here is where it is important to note DO NOT DC into the top of the ch 3, you will end up with a slanting front**
Row 7: DCto the ch 1 space, DC in the ch space, ch 1, skip to the next ch 1 space, DC in that space, DC to next ch 1 space, DC in that space, ch 1, skip to next ch space, DC in that space, DC to the end, ch 3, turn
Row 8: DC in each st and ch 1 around (54 sts, including the ch 3)
Rows 9-17: DC in each st, ch 3, turn (be sure NOT to DC into the ch 3 at the end of each row)
Tie off yarn and weave in ends.  Weave ribbon between top row of DC, leaving enough tail to tie a bow in front. 
 
The ch 3 counts toward the number of stitches in the row and gives you a sweet little scalloped edge up the front of the sweater.
 
*Hat and booty patterns coming soon!*


Friday, February 22, 2013

Chevron-ish Baby Blanket

This is my favorite baby blanket pattern... for the moment.  It is super easy (so my brain doesn't hurt) and super fast (so I can actually finish it).  It looks modern, not like your grandma made it (not necessarily a bad thing, just not what I normally go for). 

It is really versatile.  Add extra stitches or rows to make it bigger and use it as a throw for an adult.  Change colors every third row (like I did on the gray, gold and white version) or every fourth row (the navy, gray and green option) or more!  Use only two colors for a real chevron look, or make each row a different color and clean out your stash.  The next one I make will be wide rows of gray and white with one row of a different color at one end.  Luckily people are breeding at an alarming rate so I will have an excuse to make it soon!

 
Here is the pattern I follow:

Special stitch dc3tog (this takes three stitches and makes them into 1, it is the bottom dip of the pattern): yo, insert hook into st and draw up a loop, yo and draw through 2 loops *yo, insert into next st and draw up a loop, yo draw through 2 loops* twice, yo draw through all loops on hook

ch 123
Row 1: dc in 3rd ch from hook *dc in next 3 ch, dc3tog, dc in next 3 ch, 3dc in next ch* repeat to last ch. 2dc in last ch.  ch3, turn
Row 2: dc in 1st dc *dc in next 3 dc, dc3tog, dc in next 3 dc, 3dc in next dc* repeat to end. 2dc in top of turning ch.
Repeat row 2, changing colors as desired.  I did 19 bands of color (each band is 3 rows) on the gray, gold and white afghan, starting and ending with gray.  I did 16 bands of color (each band is 4 rows) on the navy, gray and green version, starting and ending with navy.  I like the look of the same color on each end, but you can end with any color you like. 

I use worsted weight yarn and a J hook.  The navy afghan is Vanna's Choice, and the gold and gray is Red Heart.

Monday, June 18, 2012

Baby Blanket Marathon

So as I stated in an earlier post check it out here, I am a baby blanket making machine.  My family and co-workers are clearly fertile and I had four baby blankets to make in a very short time.  I posted the first one I made and you can see it by clicking the link above.  The blanket I am going to post now is one of my favorite blankets I have ever made.  That being said, it was kind of a pain in the ass.

I had this great idea to make a hybrid crochet/fabric quilt...  great idea, lots of work.   HOWEVER, it was awesome and dare I say, worth the effort.  I will give you the basics of how I did it.  I recommend trying it for someone you REALLY love!

Crochet Granny Quilt

What you need:
completed granny squares
matching yarn
fabric (I used 1.5 yards which was not quite enough, but that was all that they had so I made it work)
crochet thread in a coordinating color

What you do:
The first thing I did was make up a square in my desired granny pattern.  Using the dimensions from that square, I decided how big I wanted my blanket and determined how many crochet squares I would need as well as how may fabric squares I would need for the blanket.

Once I knew what I needed, I made all my granny squares.  This was the easy part.

Then, I made fabric squares the same dimension as the granny squares, adding 1" to the width and height to allow for a 1/2"seam allowance all the way around.  Be sure to cut two for each square that you need.  Layer two squares, right sides facing, and sew three sides together.  Clip the corers, turn and press.  Turn in the seam allowance on the fourth side to the inside of the square.  There is no need to stitch this edge, it will be closed in the assembly of the blanket.  Repeat with the remaining squares.

Now for the fun part.  Sewing together the squares.  In case you didn't catch it, that was sarcasm.  This is what sucked.  I did not feel that I could accurately sew them together with a machine, sooooooo, I stitched them together by hand using a thin crochet thread.  I did a basic running stitch, and used a coordinating color.  THIS WILL SHOW ON THE FINISHED PROJECT!  Take your time, it will be worth it.  I also made sure to stitch the corners of the fabric squares together where they meet for added stability.  I also did this with the crochet squares to prevent stretching.

Once the squares are all stitched together, it is time for the edging.  Since the fabric squares do not have holes to get the crochet hook into, you need to blanket stitch across their edges.  I made sure to count how many edge stitches I would get in each granny square and did an equal number of blanket stitches in each fabric square so it would be a smooth transition all the way around.  Use the same color yarn you will be using for the first row of edging when doing the blanket stitches.  I did three rows of border, each a different color, around the blanket.  At the corners, I duplicated the corners of my granny square pattern.

Weave in any loose yarn ends and holy cow you are done.  It is a labor intensive process, but for the right person, a labor of love.  Mine definitely went to a deserving and appreciative recipient.  That is all a girl can ask for.
 
 
***Like this blanket?  Check out my Crochet Backed Quilt or my Quilted Granny Square Blanket .


Saturday, January 14, 2012

Food vs. Craft

I have so many things to share!  I can't decide which to post about first.  Last night, I made lasagna and a green salad with cabbage and a caper vinaigrette.  BUT, I also made the cutest crochet earrings.  Then I made flour-less peanut butter cookies (yes, you heard me right).   Decisions, decisions.  I think I will go with...

Crochet Earrings
So I would describe myself as a knitter.  I have always thought that you were either a knitter OR a crocheterererer (did I spell that right?).  Then I realized how much I love crochet motifs.  I found a book full of the most beautiful little crochet pieces.  It got me to thinking.  These would make beautiful jewelry!  There were only a couple of problems with this discovery.  Problem #1: Yarn is soft and won't hold the shape for an earring  Problem #2:  I can't crochet.
I knew I could overcome the yarn issue, but could I figure out how to crochet?  Turns out yes.  Yes I can.  And so could you.  
If you are having issues, start with a bigger hook and worsted weight yarn.  That will help you see how the motif goes together.  I will admit the thread was a little challenging at first, but totally worth the effort.   Be brave, take a deep breath and dive in!

What you need
Size 10 (1.3 mm) crochet hook
Size 20 thread (I found this in the yarn aisle.  I used Lizbeth.  It can be used to knit, crochet, or tat.  I feel an adventure in tatting coming on)
Fabric stiffening spray
Earring wires
Pins
Needle
Cardboard box
Paper towel

What you do
This motif is from 201 Crochet Motifs, Blocks, Projects and Ideas by Melody Griffiths.  I am going to give you the basics.  I chose this one to start because all you have to know how to do is chain, slip stitch, and single crochet.  Here is a link that will show you how to do all those and more! http://cache.lionbrand.com/cgi-bin/faq-search.cgi?store=/stores/eyarn&learnToCrochet=1

Chain 8 stitches and connect them with a slip stitch to form a ring.

Remember when I said it kind of sucked to work with the thread?  Soooooo tiny.  Make sure you have good lighting to work under or you will feel sooooo blind.

Round 1: chain 1, *1 single crochet in the center ring, chain 16*

Repeat the stitches between the stars above, until you have 12 petals.

Almost there.

Once you are done, cut the thread a few inches away from your work, pull it through the loop left on your hook and pull it tight.

Round 2: Tie the end of your thread to one of your petals,
and chain 1 then single crochet in the same loop you just tied on to, chain 6

*1 single crochet in the next petal, chain 6*
Note: Be careful to be sure your petals are not twisted while doing this or they will be wapperjawed.  It's a word.  Look it up.

 repeat this (*) on all the petals until you are connecting the last petal to the first petal.  Use a slip stitch to hook your last chain 6 to the first petal.

Round 3: Slip stitch in the first 6 chain space from round 2, chain 1 * work 3 single crochets, chain 5, 3 single crochets, all in the same 6 chain space*  Repeat (*) around until you have done all 6 chain spaces from round 2 then slip stitch in the first single crochet to connect the round.  Cut thread a few inches from your work and pull through the loop left on the hook.  Using a needle, carefully thread your loose ends back into your piece.  You don't have to do much, since we are making it very stiff, so the chance of it coming undone is slim.  Once you have stitched the end in a little, cut the extra off.  Now it's time to stiffen them up.

You will notice your motif does not look too pretty when you are finished with it.  Do not despair!  It's nothing a little (okay, a lot) fabric stabilizer can't fix.  To get your earring to show off it's pretty shape, you will need to stretch it out and pin it in place.  I used an old cardboard box and put a paper towel on it.  Then I pinned it down, putting my pins in at an angle.  I would put in one pin and then the one directly across from it, checking to make sure I did not distort the overall shape and make it look asymmetrical.
This is what I used to firm it up.  I sprayed on a few coats, waiting about an hour between each.  Then the earring was stiff enough to remove the pins.  I flipped it over and sprayed the back.  At this point, I could put it in the microwave for about 30 seconds to speed the process up.  Check your bottle to see what they suggest.  I kept spraying and drying until it was as firm as I wanted it.  I looped on an ear hook and boom!  Crochet earrings!


Tuesday, December 20, 2011

Quilted Granny Square Baby Blanket

I am going to ease off the food (for today) and show you how I made this sweet baby blanket.  I decided to quilt this granny square blanket because the back side looked... well, awful.  I used fleece instead of batting because I didn't want fluff to ooze out the holes in the squares.  It turns out, it didn't even need the fleece.  When I do this again (and I will), I will omit the fleece.  It made it a little too thick for my liking (not so thick I felt the need to take it apart though).  I will con my mom in to showing me how to crochet a granny square so I will give you the know-how on that soon!

Quilted Granny Square Baby Blanket


This is not an exact tutorial.  Sorry.  The quantity of materials will vary greatly, depending on the size of your blanket.

You will need
completed afghan
enough baking fabric to cover the size afghan you have
trim fabric, I used about 1/4 yd
enough fleece to cover your afghan (as I said, I would not use this next time)
thread

What you do

Lay out your blanket with the backing on the bottom, then the fleece (if using), and the afghan on top.  Pin layers together LIBERALLY.

Since my afghan is a granny square, I chose to machine quilt along the edges of the squares.  Base your quilting on the design of your afghan.

Trim the excess fabric from around the edges of your quilted blanket.

Now it is time to make your binding.  Choose the width you want your finished binding to be and multiply it by 4.  I wanted mine to be 1/2" so I cut my binding 2" wide.  Fold each piece in half and press, then open up and fold each raw edge in to the pressed line and press again.

It will look like this.

Pinning as you go, sandwich binding onto blanket and hand stitch (sorry) onto blanket, overlapping edges of binding as necessary.  This is a labor of love and I promise, promise, promise, it is worth it!

My friend teared up a little when I gave this to her.  I am twisted enough to find that very satisfying.
 
***Like this project?  Check out my Crochet Backed Quilt or my Crochet Granny Quilt.***