Showing posts with label Cooking. Show all posts

Tuesday, September 20, 2016

Pumpkin Muffins

My husband and I somehow managed to breed two little boys who are big breakfast eaters.  When I was a kid, eating breakfast meant I would be barfing on the bus (very susceptible to car sickness) and over the years, I guess my body got used to not eating first thing in the morning.
My daughter is the same way.
My husband doesn't eat breakfast either.  I'm not sure about the childhood trauma that explains his morning time eating issues, but I'm sure they're there.
So, for a loooong time, I didn't have to worry about what to fix for breakfast.
Then along came the savages.
They are asking for at least five or six different things to eat before their feet even hit the ground in the morning so I've had to come up with some options.
The recipe I'm sharing now, is my little guy's favorite 'fuffin'.  There's a little extra work at the beginning, but what with the worlds obsession with pumpkin spice EVERYTHING, I figured you wouldn't mind as long as it was worth it, and trust me, it's worth it.

Pumpkin Muffins

Ingredients:
16 oz. can pumpkin (unsweetened, not pie filling)
1 c. sugar
1 tsp. cinnamon
1/2 tsp. salt
1/2 tsp. nutmeg
1/2 tsp. ginger
1-1/3 c. all-purpose flour
2/3 c. whole wheat flour
1 tsp. baking soda
1 tsp. baking powder
4 Tbs. unsalted butter, melted
2 eggs
1 tsp. vanilla

Directions:
Cook pumpkin, sugar, cinnamon, salt, nutmeg and ginger in a medium saucepan over medium-high heat, stirring constantly until thick and shiny (5-7 minutes).  Set aside.
Whisk flours, baking soda and baking powder together in a large bowl.
Add butter and vanilla to pumpkin mixture.  Stir a little of pumpkin mix into eggs to temper them so you don't end up with scrambled eggs, then add to pumpkin mixture.
Fold pumpkin mix into flour mix until just combined.  Batter will be very thick.
Divide batter into 12 muffin liners sprayed with nonstick spray and bake at 350 degrees for 19 minutes or until toothpick inserted into center of muffins comes out with just a few crumbs attached to it.
Let muffins cool on rack until they won't burn your face off.

Sunday, July 17, 2016

Sunday Morning Pancakes


I have long been on the search for the perfect pancake.  I wanted a light and fluffy pancake with great flavor and some height.  One would not think this was much to ask, but considering most restaurant breakfasts feature gummy, wet and flat versions, I figured it might take a while.  If they do it like it's their job (which it is) using a commercial griddle and still can't make a good pancake, me in my  unprofessional grade kitchen might be screwed.  And screwed I was.  I have made pancakes upon pancakes, upon pancakes.  I have tried Amish recipes (I always go there first because I figure if anyone can do something right it's the Amish... not true... they don't make good pancakes either.) I have separated eggs and whipped egg whites, I have even made sourdough pancakes (the worst of the bunch AND the most work).
So when I sat down to look for yet another pancake recipe, I didn't hold much hope.  I can across a recipe that made enough pancakes to feed an army and seemed to have less liquid than most other recipes.  I thought at least maybe these would not spread as thin so maybe it would be a good start.  I reduced the recipe to a third of it's size and adjusted the measurements ( I am NOT measuring 3/4 c. plus 2 Tbsp. of flour---that became 1 even cup) and made a batch up.  Never in my wildest dreams did I imagine that I had actually found the pancake of my dreams.  Tall and tender with a light and airy center AND since they use only buttermilk, they have a yummy, rich flavor.
So, if you have long been searching for the perfect pancake, rest easy, the quest is over!


Sunday Morning Pancakes
Ingredients:
1 c. flour
1 tsp. baking powder
1 tsp. baking soda
pinch salt
1-1/2 Tbsp. sugar
1 c. buttermilk
1 egg
1 Tbsp. melted butter
Directions:
Mix together flour, baking powder, baking soda, salt and sugar in a large bowl.
Mix together remaining ingredients (I do this in a glass measuring cup starting with the buttermilk).
Pre-heat griddle to 300 degrees or heat skillet over medium heat.
When pan is hot, gently fold wet ingredients into dry being careful not to over mix, but being sure no large flour pockets remain.
Drop onto heated griddle or pan and cook until lightly browned and top looks dry.  Flip and brown on other side.
***This recipe will make 8-5" pancakes.  IF you want more DO NOT double the recipe, make it twice.  The chemical reaction that causes these pancakes to be so airy is very short lived.  If the batter sits too long, you will end up with gummy, flat pancakes.


Tuesday, February 25, 2014

Healthy Banana Breakfast Cookies

I have a love/hate relationship with bananas.  I love a good, just yellow with a few freckles, banana.  Problem is, that particular banana complexion only lasts about 3.4325 hours.  Then you are left with 2-3 unappealing, liver spotted bananas (weird how its always 2 or 3). 
A few months back, I saw a "cookie" recipe that used only quick oats and bananas.  Out of curiosity more than anything, I gave it a try.  They were odd.  The insides were mushy and a little pasty, but the outsides firmed up a bit and had a pleasant chew to them.  I decided with a little tweaking, there could be a decently healthy breakfast style cookie hiding in there.
A few attempts later I managed a flavorful, slightly chewy breakfast cookie that had a little crispness at the edges and an almost creamy (non-gluey) center.  My 15 month old LOVES them.  I LOVE them.  Now I can eat cookies for breakfast and not feel like I ruined my day before 8am!

Healthy Banana Breakfast Cookies

Ingredients:
2-3 ripe mashed bananas
1/4 c. canola oil
1 tsp. vanilla
1/2 tsp. cinnamon
1 c. rolled (old fashioned) oats
1 c. quick oats
add ins of your choice, I used 1/3 c. mini chocolate chips

Directions:
Mix together bananas, oil, vanilla and cinnamon.
Stir in oats and let sit for 15 minutes.
Fold in any extras you want, try coconut, nuts, dried fruit or peanut butter.
Drop by the tablespoonful onto a parchment lined baking sheet and bake at 350 degrees for 25 minutes.


***These take a while to bake because of all the moisture in the bananas.  The should be golden brown and firm.***

***Do not omit the oil.  It is crucial to the texture of the cookies.***

***Freeze any extra cookies that you won't eat within 24-ish hours.  Pop them in the microwave to heat for a softer cookie or the oven for a firmer cookie.***


Monday, December 16, 2013

Homemade Marshmallows

My little people LOVE marshmallows.  Plain, roasted, in hot cocoa, big, small it does not matter.  They want them... all.

I am not a huge lover of marshmallows.  I like them roasted and that is about it.  However, I am a huge fan of cooking challenges and making my own marshmallows fit the bill.  I found a recipe in an old, old cookbook I have and on a cold and snowy Friday night, decided to give it a try.

Oh.  My.  Goodness.  The difference is huge.  Store bought marshmallows are spongy and pebbly on the outside and taste... well, just sweet.  Homemade marshmallows are smooth and pillowy.  Like a memory foam mattress.  Dense, but soft.  I used a really nice vanilla in mine, so they have great flavor and smell wonderful.  I also dipped a few in bittersweet chocolate just for fun (those are my favorite). 

I discovered the key to painlessly making your own marshmallows is preparation.  If you follow my directions, you will have a full pan of marshmallows setting up in under 15 minutes.  One additional suggestion is be sure to wash your dishes immediately after you are done, so you aren't stuck trying to scrub away stuck on marshmallow in the morning.  Other than that, these are simple and fun to make.  Maybe fancy some up and give them as gifts for the holidays?

 
Homemade Marshmallows
 
Ingredients:
2 c. granular sugar
1 Tbsp. light corn syrup
1-1/2 c. water, divided
4 Tbsp. unflavored gelatin (this is equal to 4 packets or 1 box)
2 egg whites
1 tsp. flavoring, I used vanilla, but you could use peppermint or almond
1 c. powdered sugar for dusting the marshmallows to keep them from sticking
 
Directions:
Butter and liberally dust a 9"x13" pan with powdered sugar.
Combine granular sugar, corn syrup and 3/4 c. water in a large saucepan.
Pour remaining water (3/4 c.) in a small saucepan and sprinkle gelatin over the top.
Place egg whites in the bowl of a stand mixer fitted with the whisk attachment.
Turn heat under sugar mix to medium high and begin to heat, stirring constantly.
At the same time, turn heat under gelatin to low and whisk occasionally until gelatin melts.
Heat sugar mixture (syrup) to hard ball stage (250-265 degrees).
Once syrup is at the correct temperature, take off heat and whisk in gelatin.  This will foam up.
Pour this mixture into a measuring cup to make pouring easier.  Set aside.
Whip the egg whites on high until they form soft peaks.
With the mixer running, slowly pour in the gelatin mixture.  This will continue to fluff up and become glossy and smooth.
Keep beating until mixture is very stiff, but still pourable.
Spread in prepared pan and allow to set up at least 8 hours or overnight.
Once set, flip marshmallows onto a powdered sugar dusted counter.  You may need to use a thin spatula to gently loosen the marshmallow sheet from the pan.
Using a sharp knife, cut into desired shape, dusting all sides with powdered sugar as you go.
 
 
Don't forget to dip some in melted chocolate and hide them on the high shelf in the pantry!


Thursday, December 12, 2013

And the Winner is...

If you are up to date, you know that my family had a cookie exchange this weekend.  You also know that in my family, a little competition is considered healthy so we turned it into a contest to see who had the best cookie.  Unfortunately, we all made copious amounts of cookies and flaked out on making the official winning cookie decision.  However, I am prepared to announce my favorite cookie of the day, AND I will share the recipe with you (season of giving right?).

You will be thrilled to know the recipe for my unofficial winning cookie is simple (only four ingredients) and even (spoiler alert family members) no-bake so it is a great way for kiddos to help with the holiday baking.  Once you make these crunchy, chewy, peanut buttery cookies I promise you will make them over and over.  We do!

 
Special K Cookies
 
 
Ingredients:
1 c. granular sugar
1 c. Karo syrup (white)
1 c. peanut butter
4 c. Special K cereal
 
Directions:
Place cereal in a large mixing bowl.
Heat sugar and Karo in a saucepan over medium-high heat until it comes to a full rolling boil (this means it is boiling so hard, it does not stop when you stir it), stirring constantly.
Remove from heat and add peanut butter, stirring to combine.
Pour over cereal and mix well.
Roll into balls and place on wax or parchment paper to cool.
Store in an airtight container.
 
***Don't know what Karo syrup is?  It is corn syrup, you want the light version for this recipe.***
***For an extra twist, melt some chocolate chips in a baggie, snip off the tip and squiggle over the top of the cookies.  Yum.***


Monday, December 9, 2013

Chewy Lemon Cookies

Tis the season... for cookie baking!  As we discussed yesterday, the ladies of my family enjoyed a cookie exchange over the weekend.  I already shared one of my cookie contributions, and today I will share another.  These will lead up to my announcement of my favorite cookie of the party.  I know you are dying with anticipation.  One. More. Day.

Chewy Lemon Cookies
 
Ingredients:
1/2 c. butter, softened
1 c. sugar
1/2 tsp. vanilla
1 egg
1 tsp. lemon zest (I used more)
1 Tbsp. lemon juice (I probably used more, I just squeezed some in)
1/4 tsp. salt
1/4 tsp. baking powder
1/8 tsp. baking soda
1-1/2 c. flour
1/2 c. powdered sugar
 
Directions:
Cream butter and sugar. 
Mix in vanilla, egg, lemon zest and juice.
Combine dry ingredients (except powdered sugar) and stir into butter mixture until just combined.
Roll into heaping teaspoon sized balls and place on a parchment lined baking sheet.
Bake at 350 degrees for 9-11 minutes.
Cool, then dip tops in powdered sugar.


Sunday, December 8, 2013

Pecan Lace Sandwich Cookies

This morning the ladies of my family got together for brunch and a Christmas cookie exchange.  Back in the day, my mom and her sisters would bake and decorate cookies together.  I remember these parties and how fantastically fun they were.  I wanted to resurrect this tradition, but baking cookies together seemed a little lengthy... and messy.  I decided to host a "Christmas Cookie Munch and Brunch".  Everyone brought a brunch item and a batch of cookies.  To encourage participation, I made it a competition (my family is competitive in a healthy, fun sort of way see more on that here ).

I was not disappointed.  Not only did everyone bring their A-game, they brought multiple games.  We had so many freakin' cookies.  We had biscotti (three types to be exact), wedding cookies, eggnog cookies, chocolate chip cookies, gingerbread, macadamia nut cookies, scones and more. 

Over the next few days, I will share my cookie recipes with you and I will announce my favorite cookie of the party (not that it matters because we baked too many cookies and flaked on the contest).  So get out your parchment and baking sheets and lets go!

 
Pecan Lace Sandwich Cookies
 
These are almost a cross between a cookie and candy.  They are light and crispy, and were a big hit at the brunch.
 
Ingredients:
1/2 c. pecans, toasted and cooled
1/4 c. flour
4 Tbsp. butter
6 Tbsp. packed, dark brown sugar
1/4 c. dark corn syrup
2 tsp. vanilla
1-1/2 tsp. heavy cream
pinch salt
8 oz. bittersweet chocolate, melted and cooled
 
Directions:
Process nuts and flour in food processor until only small pieces of pecan remain.
Combine butter, sugar and syrup in a saucepan and cook over medium heat until boiling, stirring constantly.
Remove from heat and whisk in pecan mixture, vanilla, cream and salt.
Drop by the scant teaspoonful onto parchment lined baking sheets, at least 3" apart (these cookies spread A LOT).
Bake at 350 degrees until cookies are no longer bubbling, 5-7 minutes.
Let cookies cool on baking sheet 10 minutes, then transfer parchment sheet to counter and cool completely.
Spread 2 teaspoons chocolate onto cookie bottoms and gently top with another cookie.
Let chocolate set before serving.
 
***Adapted from a recipe by America's Test Kitchen***


Tuesday, November 12, 2013

Bean Bags

I use beans a lot.  Beans are yummy and kids like them.  Beans are easy to mush around if you don't have a bunch of teeth yet.  And, beans are cheap... kind of.

I am always playing mental tug of war when I go to buy beans.  On one side is the much cheaper, but also mushier, store brand can of beans and on the other side, the significantly more expensive, but (I hate to admit) superior quality, can of beans.  I realize we are talking under a buck difference, but that can add up quickly, especially when you use them frequently.

I was watching my new favorite cooking show (new to me, not new to existence), 10 Dollar Dinners, and Melissa d'Arabian was cooking with beans.  She buys dried beans, which she cooks, then freezes.  Holy great idea!

I loaded up on dried beans at the grocery this weekend, then spent a few hours today (okay, it was 4, but most of the time is hands off) soaking, cooking and bagging.  I ended up with the equivalent of 16 cans of beans for less than the cost of 4.  Go me.  Next time I will do it when my 10 year old is home.  Bagging the beans will be a great job for her... and less work for me.

 
How to Freeze Beans
 
 
Soak the beans.
I prefer to quick soak mine which means you combine 1 lb. dried beans and 8 cups hot water in a large pot, heat to a rapid boil for 2 minutes, cover and let stand, off heat for 1 hour.  You can also do an overnight soak.  To do this, add 8 cups cold water to 1 lb. beans and let stand overnight or at least 8 hours.
 
Drain and rinse the soaked beans.
 
Cook the beans.
Add 6 cups hot water to beans in large pot.  Simmer gently until tender.  This will take 1-2 hours.  Check beans at 15 minute increments after the 1 hour mark and cook until tender, but not mushy or falling apart.
 
Drain the cooked beans and rinse in cold water.
 
Bag the beans.
Each pound of dried beans will yield 6 cups of cooked beans.  I freeze mine in 1-1/2 cup quantities which is about the same as 1 can.  Label your freezer bags with the bean type and quantity before you fill them (I know, duh).
 
Freeze the beans.
Again, duh.


Sunday, November 10, 2013

Peanut Butter Crunch Banana Bread

I love banana bread as do my people.  It is a good thing, because I accidentally left my brand new bunch of bananas next to the last banana from my previous bunch and ended up with six, yes six, overripe bananas.  That was a lot of banana typing.

Luckily, each loaf of banana bread requires three overripe bananas.  So, guess who got to make two loaves of bread?...  this girl.  And since I am easily bored, I decided to experiment and create two different types: Peanut Butter Crunch and Double Chocolate.  First, I am going to share the peanut butter version with you, because it was my favorite.  With peanut butter stirred into the batter AND made into crumbles that are layered with the batter then sprinkled on top, it is a peanut butter banana explosion.  So, if you are staring down some brown bananas and want a fresh take on the old standard, try this out.  I promise you will not be disappointed!

 
Peanut Butter Crunch Banana Bread
 
 
Ingredients:
2 c. flour
2 tsp. baking powder
1/2 tsp. salt
6 Tbsp. butter
1/2 c. sugar
2 eggs
3 very ripe bananas
1 tsp. vanilla
3/4 c. peanut butter
3/4 c. brown sugar
 
Directions:
Stir together flour, baking powder and salt in a small bowl.
Melt butter in a pan over medium low heat.  Continue to heat butter until solids (they look like sand at the bottom) begin to turn golden brown and butter smells nutty.  Be careful once it starts to brown, it can burn VERY quickly!  Let cool a few minutes.
Combine 1/2 c. sugar and browned butter in mixer and beat together.
Add eggs, bananas, vanilla and 1/4 c. peanut butter and beat to combine.
Add flour mixture and mix on low until no flour pockets remain.
Using a fork, combine remaining 1/2 c. peanut butter and 3/4 c. brown sugar in a small bowl.
Spray a loaf pan with non-stick spray and spread 1/3 batter in bottom.
Top with 1/3 brown sugar mixture.  Repeat two more times, finishing with sprinkling the last of the brown sugar crumbs on the top of loaf.
Bake at 350 degrees for 55 minutes, or until toothpick inserted in center comes out clean.
 
 
***Want more crunch?  Try crunchy peanut butter instead of smooth.***
***Want another banana bread recipe?  Check out Banana Lovers Banana Bread .***
***Want another super peanutbuttery dessert?  Check out my Peanut Butter Lovers Pie .***


Monday, November 4, 2013

Peanut Butter Lovers Pie

My people love peanut butter.  They love it in sandwiches, cookies, ice cream, noodles and on spoons.  Most of all, they love it in pie.

I have a peanut butter pie I have been making for quite a few years.  It is a simple, no bake pie and it is super yummy.  Recently, I went to whip one up and remembered my mom making a peanut butter pie when I was little.  Her pie was very different from mine.  It was also simple, consisting of peanut butter and sugar mixed together to make a crumbly concoction that was sprinkled in the bottom of a baked crust and then topped with instant vanilla pie filling.  Easy, but not very peanut buttery.  My version packs a pretty good peanut butter punch, but I decided the peanut butter crumbs from her pie could make it a knockout.  So, here you go.  My new hybrid extra peanut buttery pie.  Be sure you have plenty of milk!

Peanut Butter Lovers Pie
 
Ingredients:
Pre-baked pie crust (want an easy recipe?  Try my simple crust )
1 package Dream Whip, prepared according to directions (you could also use about 3/4 of a tub of Cool Whip)
6 oz. cream cheese, softened
3/4 c, powdered sugar
1/2 c. brown sugar
1 c. peanut butter, divided
2 Tbsp. milk
 
Directions:
Combine brown sugar and 1/2 c. peanut butter with a fork until combined and crumbly.
In a separate bowl, combine cream cheese and powdered sugar and beat until smooth.
Add remaining 1/2 c. peanut butter and milk and beat until smooth and a little fluffy.
Carefully fold prepared Dream Whip into cream cheese mixture.
Sprinkle 1/3 peanut butter crumbs in the bottom of prepared shell.  Top with 1/2 filling. 
Repeat layer and end by sprinkling last 1/3 of crumbs over the top of pie.  Chill. 
 
***Don't have Dream Whip or Cool Whip?  Make 2 c. (finished volume) of lightly sweetened whipped cream.***
 
***Immediately after this post went up, my mother called to let me know that even though her recipe may have called for instant pie filling, she made her own filling from scratch.  She has "never in her life" used instant pie filling.  So, do not doubt my mother's amazing cooking skills.  Apparently it irks her... greatly.***


Monday, October 28, 2013

Caramel Crunchers

My family celebrated our October birthday's this weekend.  I am so lucky to have grown up with such a large loving group of people, but my children's Naners (long explanation, not currently relevant) will be the first to add that I am lucky to have grown up with so many good cooks!

I attribute my family being full of good cooks to two things:  First, my family is also full of creative individuals.  Our collective abilities include painting, spinning, crochet, knitting, quilting, jewelry making, photography, poetry, and on and on.  It is kind of ridiculous how talented my family is. 

The second and more important trait that resulted in so many good cooks is competitiveness.  Not in a bad "in your face, you suck looser" sort of way, but in a "I can't wait for all those bitches to eat my food and realize I am the superior cook" sort of way.  Just kidding.  Not like that either.  It is actually hard to explain, but I will try, just for you.

We love trying new things and are excited to find and create new recipes that no one has ever tried.  My family is great about appreciating a new yummy food and oooh-ing and ahhhh-ing over it therefore,  everyone wants to make something that is new, exciting, and oooooh ahhhhhh worthy.  That is what I mean by competitive.

At the party we had stuffed pepper soup, borscht, white chili, roasted corn chowder, tomato bisque, Chicken gnocchi soup and paninis with fancy cheese (It was a soup theme.  Yes we have themes.  Don't be jealous.).  We also had a REAL lemon pie that my Aunt Anne made from a family recipe that includes directions like "some" "good amount" and "hot oven".  It was tart and lemony and fabulous. 

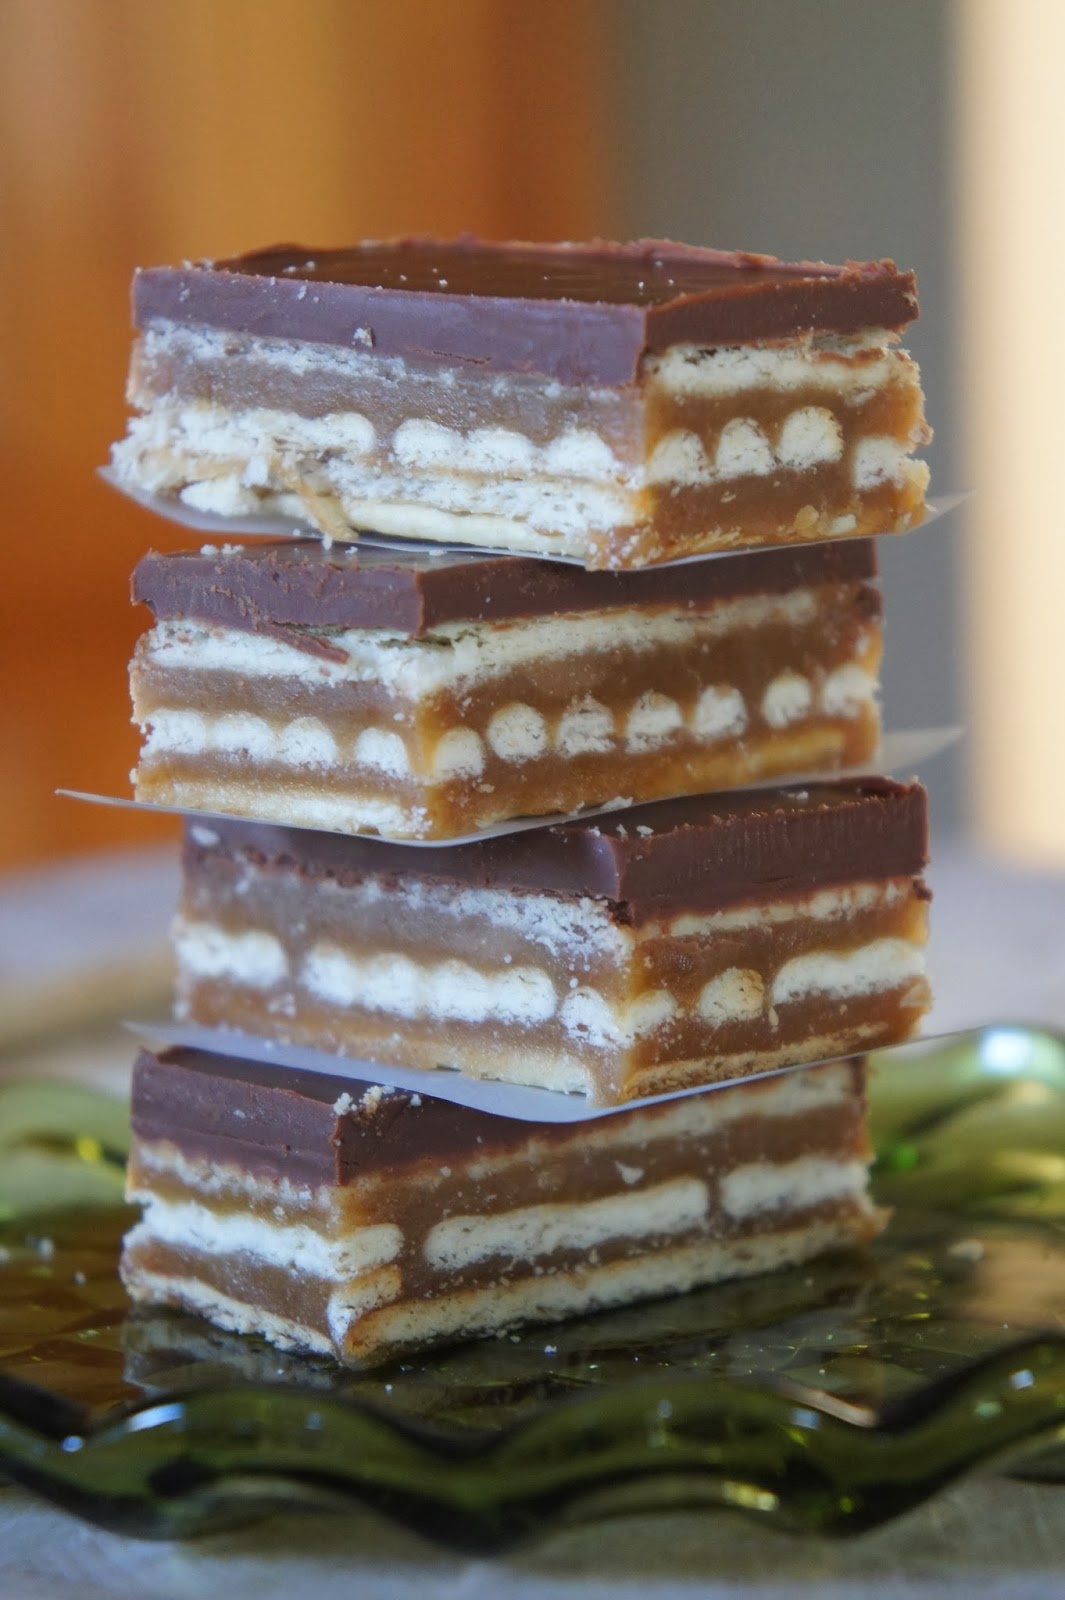
I made these bars and they appeared to be a hit, and I have to admit it they were pretty tasty.  They are a perfect combination of sweet and salty.  They don't require baking, so they would be a great summer dessert.  They are simple to make (don't be scared of making the caramel, it is easy) and go together quickly, especially if you have a helper to layer the crackers (perfect job for my 10 year old).

Caramel Crunchers
 
 
Ingredients:
Club crackers (you will use almost the whole box)
1 c. butter (2 sticks, I use unsalted since the crackers are salty)
1 c. brown sugar
1/3 c. granular sugar
2 c. graham cracker crumbs (I used 1 sleeve's worth because it turns out, that was all I had)
1/2 c. milk
1 tsp. vanilla
1/2 c. bittersweet chocolate chips
1/2 c. butterscotch chips
2/3 c. peanut butter (I used creamy, but crunchy would be good too)
 
Directions:
Line a 13"x9" pan with foil and spray lightly with cooking spray focusing on the sides.
Cover the bottom of the pan with a layer of club crackers.
In a saucepan, melt butter.  I browned mine because I love the nuttiness it adds.
Add sugars, graham cracker crumbs and milk to melted butter and heat to a boil, stirring constantly.
Continue to boil 5 minutes.  Take off heat and stir in vanilla.
Spread 1/2 caramel (that's what you just made!) over crackers in pan.
Add another layer of crackers followed by the rest of the caramel and then a last layer of crackers.
Heat chips and peanut butter in a small saucepan over medium heat until melted and smooth.
Spread over the top cracker layer.
Chill at least and hour before cutting with a sharp knife.  I used the little indentations from the crackers on the top as my cutting guide to make even sized bars.


Thursday, October 17, 2013

Easiest Pie Crust EVER

I come from a family of cooks.  Anytime we are together the conversation ALWAYS turns to food.  A great new restaurant, favorite food your mom made, best new recipe and on and on.

Today, I am sharing a recipe my Aunt Becky found.  She has been telling me about it for quite a while and I just now got around to trying it.

I have been using my grandma's pie crust recipe for years (see it here along with my recipe for chocolate chip pie).  Occasionally I suffer from amnesia and try another recipe, but the need for a food processor and pie weights brings me back to reality.  I don't have time to go to the bathroom, let alone babysit a baking pie crust that I still have to make filling for.  So back to my grandma's crust I would go.  I didn't think it could get easier until I tried this version.  No rolling or extra dirty dishes.  Winner, winner, pie for dinner.

Pat in Pan Pie Crust
 
 
Ingredients:
1-1/2 c. flour+3 Tbsp.
1-1/2 tsp. sugar
1/2 tsp. salt
1/2 c. vegetable oil
3 Tbsp. cold milk
 
Directions:
Stir together flour, sugar and salt in pie pan.
Measure oil in a 1 cup measuring cup.  Add milk and whisk with a fork to combine.
Dump all at once into flour mixture in pan.
Stir together using fork, until no pockets of flour remain.
Pat out, using fingers across bottom and up sides of pan.  Flute edges if desired.
If you are baking to fill later, prick shell with fork and bake at 425 degrees for 15 minutes.


Tuesday, October 15, 2013

Cheater's Cafe Mocha

I love coffee.  I love the smell, the taste and considering I have three children, I am particularly fond of the caffeine.
I usually drink my coffee at home with a sprinkle of sugar and a splash of cream, but I am also a fan of a good café mocha.  Unfortunately, I am not always able to drag my two smaller kiddos out to grab one from the local shop, so I came up with an easy to make at-home option.  You will laugh at the simplicity of my version, until you try it.  Then you will be impressed by my brilliance.

 
Cheater's Café Mocha
also known as "My children make me a shut in mocha"
 
 
Ingredients:
milk
hot chocolate mix
coffee
whip cream if you're inclined
 
Directions:
This is made according to personal taste.  I will tell you how I like mine and give you a starting point.
Heat 1/2 cup milk in the microwave for about 1 minute.
While it heats, add 2 tablespoons hot chocolate mix to your mug.
Pour hot milk slowly over mix, stirring vigorously to combine.
Top off with coffee (I use a Keurig set on the big cup).
If you want the authentic experience, bust out the Dream Whip for a topper.
 
 
That is it!  I know right?  You've been paying Timmy Ho-Ho's two fiddy for a cup of pretty much the same thing (minus the milk, gross).  You're welcome.


Friday, October 11, 2013

Spice Rack on Crack

I love to cook.  If you did not already know that, clearly you do not spend enough of your precious time reading my blog.  Shame on you.

I have an asinine amount of food stuffs.  My pantry could comfortably sustain weeks without grocery shopping (they would be very boring, produce and dairy free weeks, but it could be done).  I also have a little bit of everything in the spice department, which has caused me a slight problem.

My house came equipped with a lazy Susan I decided was the perfect place to keep all my seasonings.  Unfortunately, this lazy Susan was made for someone who simply LIKED to cook, not one who LOVES to cook.  I had it filled to capacity and then some.  I ended up with duplicates because I could never find what I needed.  Then it was chaos.

I love Ana White.  She has a great DIY blog (http://ana-white.com/ check it out, I'll wait) and I get the updates by e-mail.  One day I saw this:


Door Spice Rack
 
 
I love, love, loved the idea of all my spices being at eye level and organized.  I wanted to make it.  Then I remembered.  I am a full time mom of a 10 year old, 3-1/2 year old and 11 month old, part time(ish) hairstylist, and my husband works ridiculous hours.  Sigh.  No beautiful homemade spice rack for me.
 
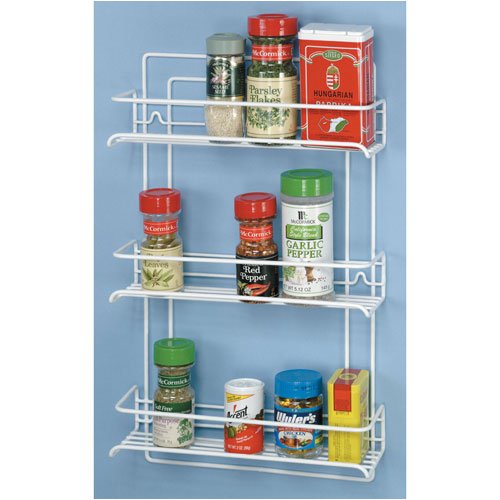
I knew this was the route I wanted to take in my pantry so I started looking for another (less time required) option.  I found these:
 
 
I knew this could be my solution.  I ordered four (yes FOUR) from Amazon and eagerly awaited their arrival (don't judge, it's the little things in life, right?)
 
They came, I easily mounted them on the inside of my pantry door and organized all my spices (By organize, I mean alphabetically.  Yes I'm serious.) 
 
 
Organization is a beautiful thing.
 
Jealous?  Want to have your own?  You can!  Order your own racks here.  Be careful when you install them so they don't bump the inside trim of your door frame (the piece that makes it stop in the right place).  Mine did a little bit so I had to adjust (meaning I sanded down the corner of the trim piece because I was NOT moving the racks.  They each have six screws.  NOT HAPPENING.)  I do have a couple of large spices that I bought at Sam's Club and they do not fit in these racks, but all the normal size containers do.  Happy homemaking!


Wednesday, September 18, 2013

Plum Cobbler

I love plums.  I love the combination of sweet flesh and tart skin.  I must be in the minority because they don't seem to get the same attention as say, apples or peaches.  Don't get me wrong, I also love apples and peaches, but sometimes you want a new twist on your pie or cobbler.  That is when I turn to plums.

This is a simple crisp style cobbler.  It can be used with plums like I did, or if you are uninteresting, apples or peaches.  Actually a lot of fruits would work, so experiment away (grapes or strawberries maybe?).  It is made using a handful of ingredients you probably always have on hand and if you use a slice free fruit (blueberries, blackberries, raspberries) you will have it put together before your oven heats up!  I call that a win.

Plum Cobbler
 
 
Ingredients:
Filling:
12 plums, pitted and sliced (or enough fruit to fill an 8"x8" baking dish 3/4 full)
1/8 c. sugar (I like the tartness of plums.  If you don't increase to 1/4 c.)
1 Tbsp. cornstarch
Topping:
1/2 c. sugar
1/4 c. brown sugar
1 c. flour
1-1/2 tsp. baking powder
1 tsp. salt (if you do not like a little sweet/salty mix cut back to 1/2 tsp.)
1 egg
1 stick unsalted butter, melted
 
Directions:
Combine filling ingredients and pour into greased 8"x8" baking dish.
Combine sugars, flour, baking powder and salt.
Add egg and cut in until mixture looks like sand.
Sprinkle over the top of fruit in dish.
Drizzle melted butter over top.
Bake at 350 degrees for 40 minutes.


Sunday, September 15, 2013

Soft Batch Style

My family went camping this weekend and I needed a baked good to take along.  Need may sound like a strong word to you but I have a sweet-loving (sugar loving, NOT sweet and loving, just to clarify) (well, he is also sweet and loving, it's just not relevant to this post) husband and three kids.  Need is actually putting it mildly.  I wanted something new and exciting (I am kind of a cooking whore. Yes I said that. Yes I meant it.) so I went where ALL women go when they want something new to make (you can act like you don't know, but I know you are on Pinterest as much as I am.) 

I found a recipe claiming light, fluffy, tender chocolate chip cookies, all with the help of cornstarch.  Interesting.  I baked a batch and packed them up to go.  My husband found them.  He and the kids snarfed one dozen before we even got to the campground.  I am not sure how the rest met their demise (I have my theories), but three dozen cookies were GONE within 18 hours (for the record, 8 of those were spent sleeping).  My husband said they reminded him of Soft Batch brand cookies and apparently he REALLY likes Soft Batch cookies. 

Being the good wife I am, I offered to make him another batch when we got home.  They came out of the oven an hour ago and 14 are MIA.  Apparently they are really good cookies.  Your husband called.  He said you should make some too.


Soft Style Chocolate Chip Cookies

 
Ingredients:
3/4 c. butter, softened
3/4 c. brown sugar
1/4 c. granulated sugar
1 egg
2 tsp. vanilla
2 c. flour
2 tsp. cornstarch
1 tsp. baking soda
1/2 tsp. salt
1-1/2 c. chocolate chips
 
Directions:
Cream butter and sugars until light and fluffy (I use a stand mixer).
Add egg and vanilla and mix.
Combine flour, cornstarch, baking soda and salt.  Add to butter/sugar and mix.
Stir in chips.
Drop by tablespoonfuls onto parchment lined baking sheets.
Bake at 350 degrees for 8-10 minutes.  In my oven they take 9 minutes.
DO NOT OVER BAKE.  They will look underdone, these are not golden brown cookies.  If you over cook them they will be dry and you will be sad.

Sunday, August 4, 2013

Beer Bread

Feeding hungry people is a big part of my life.  I am stuck in a constant cycle of making food, feeding food and cleaning up food.  With all this food related work (not to mention laundry, vacuuming, sweeping, moping, straightening, scrubbing, and on and on) I am always looking for quick and easy (and yummy) options to add to my bag of tricks.
I have been making this particular recipe since I was 19.  It is one of the easiest quick breads I have ever made and it has a great depth from the yeasty, hoppy addition of beer.  My kids love it with dinner and toasted with eggs the next morning.  I love it because it takes less time to stir together than it takes for the oven to pre-heat!

Beer Bread
 
 
Ingredients:
12 oz. beer
3 c. self-rising flour
3 Tbsp. sugar
3 Tbsp. melted butter
 
Directions:
Stir together flour and sugar.
Pour in beer and stir to form a sticky dough.
Spread into a greased loaf pan and pour butter over top.
Bake at 350 degrees for 50-60 minutes.


Tuesday, July 30, 2013

Grammy's Special Seasoning

My grandmother is a great cook.  She introduced me to the wonderful, wide world of herbs.  Every year she has a beautiful herb garden and sends the kids out to snip what she needs for the dish she is making.  My daughter loves to run out and grab a big handful of basil for tomatoes or chives for potatoes (tarragon throws her though).
This is a blend of herbs and spices that my grandmother  uses for all kinds of dishes.  It is a great rub for poultry, a nice way to pep up chicken or potato soup, I sprinkle it on sautéed vegetables and my daughter's favorite use is cooked into rice.  This makes a good sized batch (about 3/4 cup) and I guarantee you will be making a second batch.

Garlic Herb Seasoning


Ingredients:
2 Tbsp. dried leaf marjoram
2 Tbsp. dried leaf oregano
2 Tbsp. dried leaf rosemary
2 Tbsp. dried leaf basil
2 Tbsp. dried leaf parsley
1 Tbsp. onion powder
1 Tbsp. dried leaf thyme
1 Tbsp. salt
2 tsp. garlic powder
1 tsp. ground black pepper
 
Directions:
Mix all ingredients in a jar with a tight fitting lid.  Store in a cool dry place.  Be sure to shake to redistribute before using!


Wednesday, July 3, 2013

Sugar Waffles-AKA Rosette Cookies

When I was little, my mom used to make sugar waffles.  They are the lightest, crispiest confections you will ever have.  A-M-A-Z-I-N-G.  If you have ever visited a fair, they are like miniature versions of the sugar waffles they sell by the bag.  I LOVE LOVE LOVE them.  A nice hot cup of coffee, a sugar waffle and a few minutes of peace and quiet.  Life does not get better.
A couple of Christmases ago, my mom bought me a set of irons so I could make my own.  Unfortunately, I have a terrible case of mommy brain and forgot all about them.  Digging through my kitchen a few weeks ago, I came across them and decided to make some with MY kids.  They are amazingly easy to whip up, and because they are so thin, cook VERY quickly.  The kids mixed the batter, I fried, then the kids sprinkled powdered sugar on top.  They were GONE.  Hopefully Emma remembers these fondly like I do.  Maybe in 20 years I will buy her a set to make my grandchildren these most amazing of treats.

Sugar Waffles
 
Ingredients:
1egg
1/2 c. milk
1/2 tsp. vanilla
1/2 Tbsp. sugar
1/8 tsp. salt
1/2 c. flour
oil for frying
powdered sugar for dusting
 
Directions:
Fill a small saucepan about 1" deep with oil and heat over medium while you mix batter.
Whisk egg, milk, vanilla, sugar and salt in small bowl.
Blend in flour until smooth.
Place rosette iron in hot oil for about 2 minutes.
Dip iron in prepared batter (it will sizzle) only come up the sides, DO NOT let batter come over top of mold or you will never get the cooked waffle off.
Immediately submerge dipped iron in the oil and cook waffle until lightly browned THIS WILL ONLY TAKE 20-30 SECONDS.
Using a fork, slide waffle onto a paper towel lined plate.
Repeat with rest of batter.
When waffles are cool, dust with powdered sugar.


This is what the rosette iron looks like.  Mine came with different molds that screw on the handle. 
Here is a set from Amazon. 


Monday, July 1, 2013

Blueberry Butter

As promised, here is how to make blueberry butter... or any fruit butter for that matter.  It is a simple process that results in a smooth spread with a concentrated fruit flavor.  It is an easy way to dress up muffins, bread or biscuits and a great use for all the prime summer fruit available.

***This is more of a "how to" than a recipe.***


Blueberry Butter

Ingredients:
blueberries (I used about 1 cup)
sugar to taste (I used about 1 tablespoon)
small amount of water (I used about 2 tablespoons, this is just to keep the berries from burning until they start to burst and release their juices)

Directions:
Combine berries, sugar and water in saucepan.
Cook over low heat until reduced and very thick, stirring frequently.  Once they start to get a little thick, they can burn VERY easily so keep an eye on them.
Let cool for a few minutes, then blend in a food processor or blender until smooth.
Chill in the refrigerator at least a few hours (or better, overnight) before serving.

***Try your blueberry butter spread on a slice of warm, tart lemon bread.***